Implementation using SaaSus Platform (Serverless)
This is an implementation example of a SaaS application using SaaSus Platform's serverless approach. You can learn while running the necessary features for SaaS, such as authentication, tenant management, and user management, in a serverless environment.
Key Features
- Serverless Architecture: AWS Lambda + CloudFront + S3
- React + TypeScript: Using React for the frontend
- JWT Authentication: Token management in browser's local storage
- CDK Support: Infrastructure construction and deployment using AWS CDK
- Monorepo: Frontend and backend managed in a single repository
Implementation Approach
This sample application is implemented as a serverless version.
Serverless Version Features
This implementation approach uses a serverless backend with the following characteristics:
- Store the token (JWT), which is the authentication information for the SaaSus Platform, in the browser's local storage
- SaaS Platform users authenticate themselves using the JWT
- The frontend is implemented with React and hosted on S3 + CloudFront
- The backend is implemented as an API server running on Lambda
Architecture
Browser
  │
  ▼
CloudFront (*.cloudfront.net)
  ├── /*         → S3 (React Frontend)
  └── /api/*     → Lambda Function URL (API)
                     ※ Only the specific CloudFront Distribution is allowed via Lambda resource policy
Implemented Screens and Features
Authentication Screens
Callback.tsx - Post-Authentication Redirect Screen
- Receives authentication information from SaaSus Platform
- Saves JWT token to local storage
- Automatically redirects to appropriate screen based on user role
- ※Not displayed to users as it's a redirect process
SelfSignUp.tsx - Self-Signup Screen
- New users create their own tenant
- Tenant name input
- User and tenant attribute configuration
- Input fields for different attribute types (string, number, boolean, date)
User and Tenant Management Screens
TenantList.tsx - Tenant List Screen
- For users belonging to multiple tenants
- Display of tenant attributes (configured/unconfigured status)
- Navigation to user list screen for each tenant
UserPage.tsx - User List Screen (Main Screen)
- Logged-in User Information Display: Tenant name, name, email, role
- User List Table: Display all users in the tenant
- User Attribute Display: Dynamic display of custom attributes
Frontend Implementation
Post-Authentication Redirect Screen (Callback)
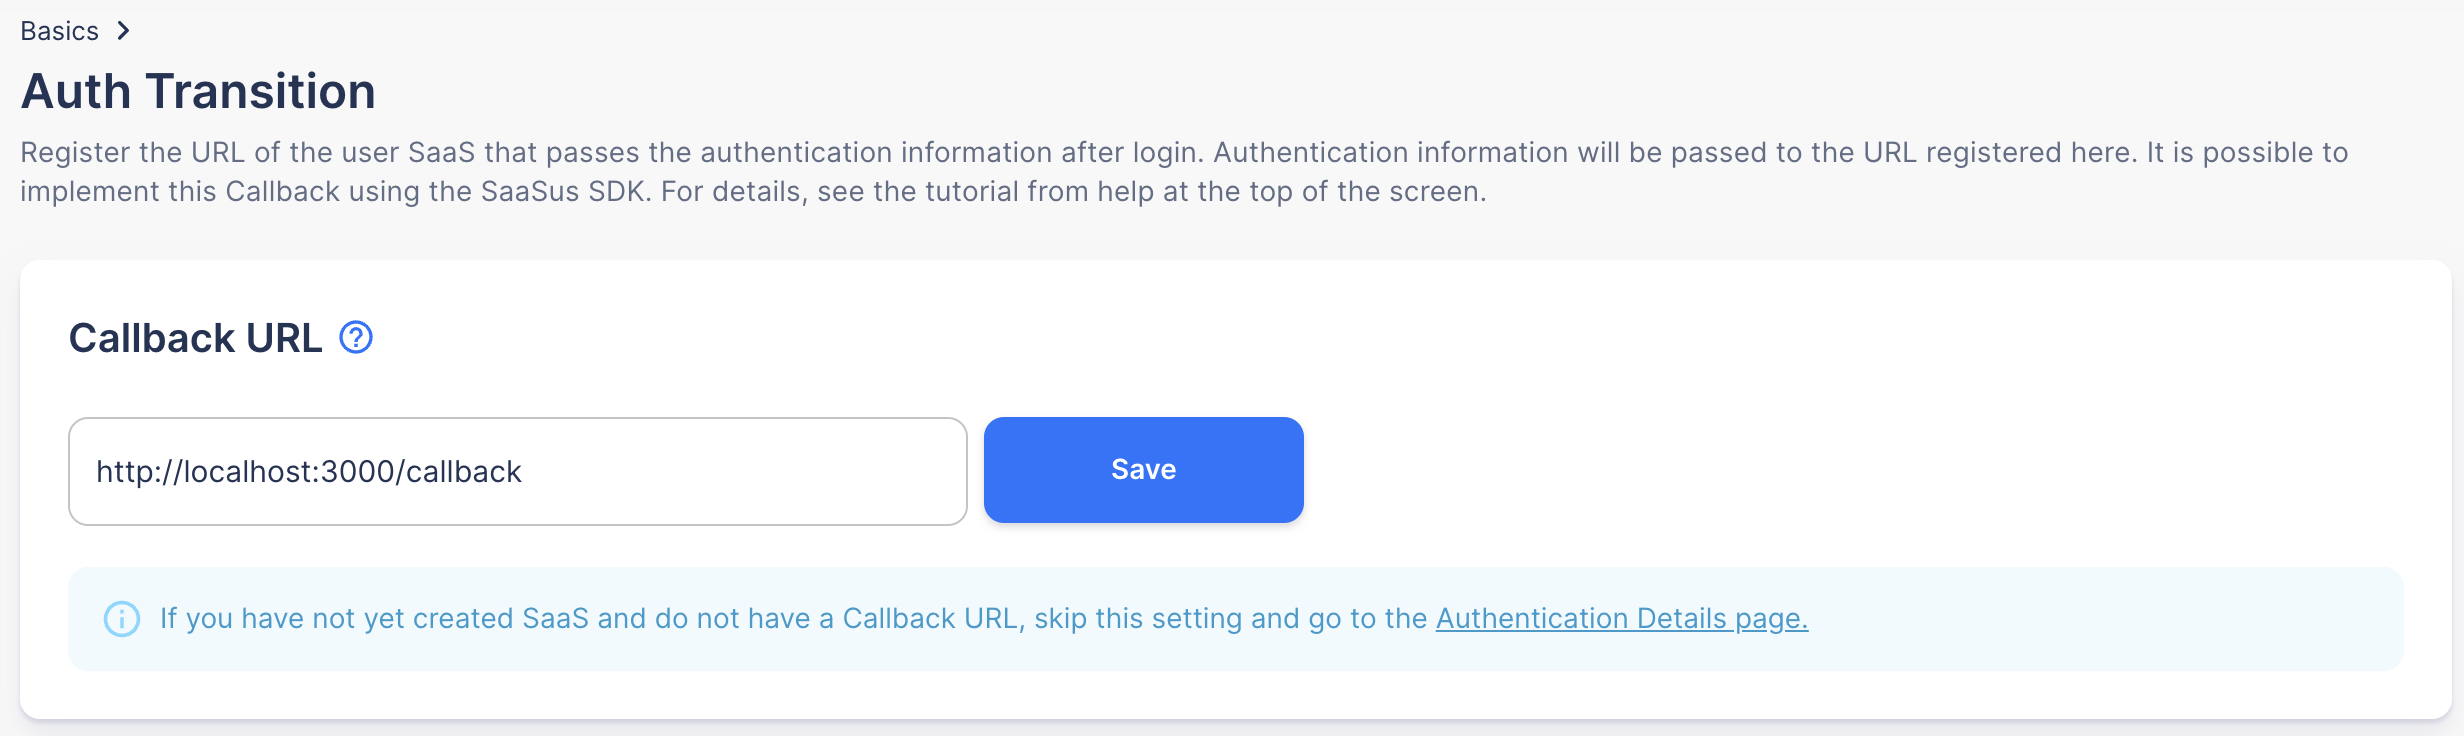
After logging in from the login screen generated by the SaaSus Platform, the URL set as the post-authentication redirect will be called.
To test using this implementation sample, set the redirect to http://localhost:3000/callback (local development) or https://xxxxxxxxxx.cloudfront.net/callback after CloudFront deployment.
After authentication, a temporary code (code=xxxxx) necessary for retrieving authentication information is passed in the query parameters of the redirect URL. Please implement a process to retrieve the JWT using this temporary code and save the JWT to local storage.
Post-Authentication Screen Transition Logic
The sample app checks user information after JWT retrieval and transitions to the appropriate screen using the following logic:
- No tenant affiliation: Transition to self-signup screen
- Multiple tenant affiliations: Transition to tenant list screen
- Single tenant affiliation: Transition to user list screen (main screen)
This transition logic ensures that the optimal screen is displayed based on the user's situation.
Self-Signup Screen
It is necessary to check if the user is logged in, so call the user information retrieval API to confirm login status.
Use the JWT stored in local storage when making API calls.
You can confirm that the user is logged in if user information is retrievable.
Tenant List Screen
This screen is for users belonging to multiple tenants. It displays a list of tenants the user belongs to and provides navigation to the user list screen for each tenant.
User List Screen (Top Page)
The user list screen displays information about authenticated users and all users within the tenant.
Backend Implementation
The backend provides multiple API endpoints on a single Lambda Function (using Hono as the web framework). All endpoints are located under the /api prefix.
JWT Retrieval API
The implementation of this API is included in the following link.
- TypeScript (Lambda):
lambda/routes/auth.ts
- TypeScript
// GET /api/credentials - Get authentication information from authorization code
auth.get('/credentials', async (c) => {
  try {
    const code = c.req.query('code');
    if (!code) {
      return c.json({ error: 'Authorization code not found' }, 400);
    }

    const { referer, xSaaSusReferer } = getRefererHeaders(c);
    const authClient = createAuthClient(referer, xSaaSusReferer);

    const credentialsResponse = await authClient.credentialApi.getAuthCredentials(code);
    const credentials = credentialsResponse.data;

    // Set refresh token as cookie
    if (credentials.refresh_token) {
      setCookie(c, 'SaaSusRefreshToken', credentials.refresh_token, {
        path: '/',
        httpOnly: true,
        secure: true,
        sameSite: 'Strict',
        maxAge: 30 * 24 * 60 * 60, // 30 days
      });
    }

    return c.json(credentials);
  } catch (error) {
    console.error('[credentials] Error:', error);
    return c.json({
      error: 'Failed to get credentials',
      message: error instanceof Error ? error.message : 'Unknown error'
    }, 500);
  }
});
User Information Retrieval API
The implementation of this API is included in the following link.
- TypeScript (Lambda):
lambda/routes/auth.ts
- TypeScript
// GET /api/userinfo - Get user information
auth.get('/userinfo', async (c) => {
  try {
    const authHeader = c.req.header('X-Id-Token');
    if (!authHeader || !authHeader.startsWith('Bearer ')) {
      return c.json({ error: 'No valid authorization header found' }, 401);
    }

    const token = authHeader.replace('Bearer ', '');
    const { referer, xSaaSusReferer } = getRefererHeaders(c);
    const authClient = createAuthClient(referer, xSaaSusReferer);

    const userInfoResponse = await authClient.userInfoApi.getUserInfo(token);
    return c.json(userInfoResponse.data);
  } catch (error) {
    console.error('[userinfo] Error:', error);
    return c.json({
      error: 'Failed to get user info',
      message: error instanceof Error ? error.message : 'Unknown error'
    }, 500);
  }
});
Self-Signup API
The implementation of this API is included in the following link.
- TypeScript (Lambda):
lambda/routes/tenant.ts
To confirm that the API request comes from a user logged into the SaaSus Platform, always confirm login by retrieving user information.
The self-signup process is as follows: Prerequisite) The self-signup user becomes the administrator of the new tenant:
a. Create a tenant
b. Link the logged-in user to the created tenant
c. Set the logged-in user as the administrator of the tenant
- TypeScript
// POST /api/self_sign_up - Self-signup
tenant.post('/self_sign_up', async (c) => {
  try {
    const body = await c.req.json<SelfSignUpRequest>();

    if (!body.tenantName) {
      return c.json({ error: 'tenantName is required' }, 400);
    }

    const headers = headersToObject(c);
    const userInfo = await getAuthenticatedUserInfo(headers);
    const { referer, xSaaSusReferer } = getRefererHeaders(c);
    const authClient = createAuthClient(referer, xSaaSusReferer);

    // Get and convert tenant attribute information
    const tenantAttributesResponse = await authClient.tenantAttributeApi.getTenantAttributes();
    const tenantAttributes = tenantAttributesResponse.data.tenant_attributes;
    const convertedTenantAttributeValues = convertAttributeValues(
      body.tenantAttributeValues || {},
      tenantAttributes
    );

    // Create tenant
    const tenantProps: TenantProps = {
      name: body.tenantName,
      attributes: convertedTenantAttributeValues,
      back_office_staff_email: userInfo.email,
    };

    const createdTenantResponse = await authClient.tenantApi.createTenant(tenantProps);
    const createdTenant = createdTenantResponse.data;
    const tenantId = createdTenant.id;

    // Get and convert user attribute information
    const userAttributesResponse = await authClient.userAttributeApi.getUserAttributes();
    const userAttributes = userAttributesResponse.data.user_attributes;
    const convertedUserAttributeValues = convertAttributeValues(
      body.userAttributeValues || {},
      userAttributes
    );

    // Create tenant user registration parameters
    const createTenantUserParam: CreateTenantUserParam = {
      email: userInfo.email,
      attributes: convertedUserAttributeValues,
    };

    // Add SaaS user as tenant user
    const tenantUserResponse = await authClient.tenantUserApi.createTenantUser(
      tenantId,
      createTenantUserParam
    );
    const tenantUser = tenantUserResponse.data;

    // Create role setting parameters (set as administrator)
    const createTenantUserRolesParam: CreateTenantUserRolesParam = {
      role_names: ['admin'],
    };

    // Set roles for created tenant user
    await authClient.tenantUserApi.createTenantUserRoles(
      tenantId,
      tenantUser.id,
      3, // Production environment ID
      createTenantUserRolesParam
    );

    return c.json({
      message: 'User successfully signed up to the tenant',
      tenantId: tenantId,
      tenantName: body.tenantName,
    });
  } catch (error) {
    console.error('[self_sign_up] Error:', error);
    return c.json({
      error: 'Failed to sign up',
      message: error instanceof Error ? error.message : 'Unknown error'
    }, 500);
  }
});
User List Retrieval API
The implementation of this API is included in the following link.
- TypeScript (Lambda):
lambda/routes/user.ts
To confirm that the API request is from a user logged into the SaaSus Platform, please always perform a login check by retrieving user information.
- TypeScript
// GET /api/users - Get user list
user.get('/users', async (c) => {
  try {
    const headers = headersToObject(c);
    const userInfo = await getAuthenticatedUserInfo(headers);

    // Get tenant ID from query parameters
    const tenantId = c.req.query('tenant_id');
    if (!tenantId) {
      return c.json({ error: 'tenant_id is required' }, 400);
    }

    // Check if user belongs to the tenant
    if (!userInfo.tenants || !belongingTenant(userInfo.tenants, tenantId)) {
      return c.json({ error: 'User does not belong to the specified tenant' }, 403);
    }

    const { referer, xSaaSusReferer } = getRefererHeaders(c);
    const authClient = createAuthClient(referer, xSaaSusReferer);

    const usersResponse = await authClient.tenantUserApi.getTenantUsers(tenantId);
    return c.json(usersResponse.data.users || []);
  } catch (error) {
    console.error('[users] Error:', error);
    return c.json({
      error: 'Failed to get users',
      message: error instanceof Error ? error.message : 'Unknown error'
    }, 500);
  }
});
Setup Instructions
Prerequisites
- Node.js: 18 or higher
- AWS CLI: Configured
- AWS CDK: Installed (
npm install -g aws-cdk) - SaaSus Platform: Account and project setup
Setup Instructions
1. Clone Repository and Install Dependencies
git clone https://github.com/saasus-platform/implementation-sample-serverless.git
cd implementation-sample-serverless

# Install backend dependencies
npm install

# Install frontend dependencies
npm run frontend:install
2. Configure Environment Variables
cp .env.example .env
Set the SaaSus credentials in .env:
SAASUS_SAAS_ID=your-saas-id
SAASUS_API_KEY=your-api-key
SAASUS_SECRET_KEY=your-secret-key
SAASUS_AUTH_MODE="api"
Also configure the frontend environment variables:
cp frontend/.env.example frontend/.env
# Login URL obtained from SaaSus Platform management console
REACT_APP_LOGIN_URL=https://auth.xxxxxxxxxx.com
REACT_APP_API_ENDPOINT=/api
3. Configure AWS Credentials
If using a profile, add --profile your-profile to the CDK commands below. If using access keys, set the environment variables:
export AWS_ACCESS_KEY_ID="your-access-key"
export AWS_SECRET_ACCESS_KEY="your-secret-key"
# If using temporary credentials, also set:
# export AWS_SESSION_TOKEN="your-session-token"
4. Deploy
# Required only once per AWS account/region
npx cdk bootstrap

# Build frontend and deploy with CDK in one step
npm run deploy
If using a profile (npm run deploy cannot pass --profile, so run individually):
# 初回のみ
npx cdk bootstrap --profile your-profile

npm run frontend:build
npx cdk deploy --profile your-profile
After deployment, the CloudFrontUrl output is the URL to access the application:
Outputs:
  CloudFrontUrl      = https://xxxxxxxxxx.cloudfront.net
  FrontendBucketName = ...
  DistributionId     = ...
5. SaaSus Development Console Configuration
After deployment, register the Callback URL in the SaaSus development console under Basic Settings > Post-Authentication Redirect.
| Environment | Callback URL |
|---|---|
| Production (CloudFront) | https://xxxxxxxxxx.cloudfront.net/callback |
| Local | http://localhost:3000/callback |
6. Verification
- Access the CloudFront URL
- Verify login functionality
- Verify each feature
Local Development
# Configure frontend environment variables
cp frontend/.env.example frontend/.env
Set the following variables in frontend/.env:
# Login URL (check in SaaSus development console)
REACT_APP_LOGIN_URL=https://auth.xxxxxxxxxx.com

# Switch to local backend endpoint for local development
REACT_APP_API_ENDPOINT=http://localhost:3001/api
# Terminal 1: Start backend (http://localhost:3001/api)
npm run dev

# Terminal 2: Start frontend (http://localhost:3000)
npm run frontend:start
Other Implementation Approaches
For API server implementation, please refer to the following documentation: